Ham and cheese souffle

>> Wednesday, December 30, 2009


In my continuing education and experimentation on the art of souffles, I made myself a delicious little ham and cheese breakfast souffle this morning. Luckily for me (and for him) my dad dropped by and was able to enjoy this treat with me. Father-daughter bonding at its best! 

Being my third souffle attempt, I am feeling more comfortable with the process.  I am to the point where I can make a mean Bechamel sauce without even looking at a cookbook and can seperate egg whites from the yolks like an old pro. This souffle turned out pretty well if I do say so myself.  The flavor was amazing and it was nice and lite.  The rise was an impressive 2 inches from the original fill line in the dish which did eventually settle down to about an inch after it had been out of the oven for a few minutes.

I have had some great souffles at RISE and wonder what their secret is for staying perfectly fluffy.  If anyone out there knows.. I would love the secret!

I made three fairly large souffles in simple coffee mugs as all my ramekins were in the wash.  This worked well though and the handle was very helpful in removing the souffles from the oven. 

To start, you need to make the Bechamel sauce:
Combine in a small saucepan over very low heat:
1 1/4 cups milk
1/4 onion with 1 bay leaf stuck to it using two hole cloves
Pinch of nutmeg

Simmer gently for 15 minutes, then discard the onion, bay leaf and cloves.  Meanwhile, in a heavy saucepan over low heat, melt:
3 tablespoons butter, and mix with
3 tablespoons flour

Cook uncovered over medium-low heat until the roux is fragrant, not darkened. Remove from heat and let cool a bit. Slowly whisk in the milk until blended without any large lumps and return to a low heat. 

Now to start on the souffle assembly.  Pre-heat the oven to 375 degrees and generously butter your souffle dishes. Dust the insides with breadcrumbs or grated Parmesan cheese, shaking out the excess.  Set aside. 

In a small skillet over medium heat, melt 1 tablespoon butter and cook until softened 2 tablespoons minced shallots. 

Remove the Bechamel sauce from the heat and transfer to a large mixing bowl.  Add in the sauteed shallots along with:
1 cup lightly packed grated swiss, mozzarella or cheddar cheese (I used mozzarella)
3/4 cup finely chopped ham
1/2 teaspoon salt
1/8 teaspoon ground black pepper
Pinch of nutmeg
Pinch of ground red pepper
6 large egg yolks, added one by one
Beat vigorously to blend and set aside. 

In a seperate large bowl, beat until stiff but not dry:
6 large egg whites
Pinch of salt

Fold the egg whites into the souffle base and spoon into your prepared souffle dishes.  Bake until the souffle is risen and golden brown on top, 25-30 minutes.  Enjoy!

Read more...

Chocolate souffle


While I am off for a couple of weeks from work on holiday, I am making an effort to learn how to make great souffle's.  I made a pretty delicious mushroom souffle last week and last night, I attempted the chocolate souffle.  Where the taste was great, it was a little too cakey...not eggy enough. The souffle didn't come out with a great rise and quickly fell. It was a learning experience for sure and think that if I had added a couple of extra egg whites to the mix, it would have worked beautifully.  Anyhow, here is the recipe I went by.

Ingredients


3 tablespoons butter
2 tablespoons unsweetened cocoa
3 ounces semisweet or bittersweet chocolate
1/2 teaspoon vanilla extract
2 egg yolks
2 egg whites
2 tablespoons sugar
pinch salt
pinch cream of tartar

Directions

1.Heat oven to 375° F. Use 1 tablespoon of the butter to grease on 16-ounce or two 8-ounce ramekins. Coat the ramekins with the cocoa, tapping out the excess.

2.In a large bowl, over a pan of simmering water, melt the chocolate and remaining butter. Stir occasionally until smooth. Remove from heat and add the vanilla. Whisk in the yolks one at a time until smooth. Set aside.

3.In a clean bowl, beat the egg whites with the sugar, salt, and cream of tartar until stiff (but not dry) peaks form. Gently fold the egg-white mixture into the chocolate. Spoon into the ramekins.

4.Bake until puffed and set, 40 minutes for a 16-ounce soufflé, 20 minutes for two smaller ones.

Read more...

Sweet Crepes with Maple Pumpkin Butter

>> Tuesday, December 29, 2009


In the kitchen poking around when I got up, I decided to whip myself up a plate of crepes for breakfast.  Crepes are similar to pancakes, but the original unlevened version originally brought to America by the first English settlers in the seventeenth century. I first made my batter then got on the phone with my mom... I was starving by the time we stopped gabbing so had to quickly cook up the crepes before I passed out!

Crepes are pretty simple to make but may seem daunting as they are so thin they seem like they would be hard to work with. Quite the contrary, actually, crepes thin consistency makes them quick to cook and easy to work with. 

To make the batter for crepes, you need:

1/2 cup flour
1/2 cup milk
1/4 luke warm water
2 large eggs
2 tablespoons unsalted butter (melted)
1 1/2 tablespoon sugar
1 pinch salt
Blend the above ingredients together in a blender or food processor and cover tightly and let sit for 30 minutes. 

In a crepe pan or shallow frying pan, lightly butter and begin cooking your crepes. You only need two to three tablespoons of batter per crepe.  Spoon the batter into the pan, remove from the medium-low heat and tilt the pan around to evenly cover the bottom of the pan with a thin layer of batter. Return to heat and let cook for 30 seconds to one minute. The best way to flip your crepe is to gently lift an edge using a thin spatula and gently lifting with your fingers to turn over.  The crepes are a little hot but not too hot to touch.

Once you have your first crepe done, place on a wax paper covered plate in the oven at 250 degrees to keep warm.  You may want to leave the door standing open a little ways so your crepes don't continue to cook.  Repeat this process until you finish your batter. This recipe makes 8 - 10 pretty large crepes.

These basic sweet crepes can be topped off with a fruit compote, butter or syrup. Today, I decided to enjoy my crepes with a maple pumpkin butter and toss blueberries over top. You too can make great crepes if you just get in the kitchen and give it a try.  Enjoy! 

Read more...

Cinnamon raisin scones with hot buttered rum glaze

>> Sunday, December 27, 2009


Adding to the festive foods for the week, I had a craving for scones this morning. Simple to make, these bite size pasteries are a perfect compliment to your morning coffee that you can snack on all day long.  I decided to make cinnamon raisin scones which I glazed with a hot buttered rum sugar sauce. The flavor is light, sweet and delicious!

Scones are actually really simple to make and I would bet you have all the ingredients on-hand already. Pre-heat your oven to 425 degrees and you are almost done before you even get started.


What you need:

1 cup flour
1/3 cup sugar
1 teaspoon baking powder
1/2 teaspoon salt
1 large egg
3/4 cup milk
A stick of butter (you will use 6 tablespoons)
1 tablespoon cinnamon
1/2 cup raisins

Hot buttered rum glaze:
3 tablespoons butter
Light rum
1/2 cup sugar
In the large bowl, mix your flour, salt, baking powder and sugar. Cut your stick of butter into pea sized chunks and add to the dry mixture and fold to evenly coat all the butter. In your small mixing bowl, combine the egg and cream and whisk together until blended. Pour into the dry mixture and fold together until your dry mix is just moist. Add in cinnamon and raisins and continue mixing until thoroughly moist and blended.

Scoop balls of the mix into a small muffin pan (should make approximately 12 small scones). Pop in the oven for 13-15 minutes and you will be enjoying your scones in no time.

In the meantime, in a small saucepan, melt butter for the buttered rum glaze.  Add in sugar and stir continually over low heat until sugar begins to dissolve.  Add in light rum and let simmer, stirring to keep the rum glaze moving as it thickens up a bit. 

When the scones are done baking, pull from the oven and remove from the muffin pan onto a plate or flat baking pan.  Spoon the glaze over top, coating the scones and let cool for a few minutes.  Enjoy!

Read more...

The perfect cheese tray


No matter what the occasion, a cheese tray is the perfect add to a party. When you are asked to tote the cheese tray, some may wonder what types of cheese to bring and how best to arrange the cheese. I always volunteer to put together this wonderful appetizer as I hate walking into a room and finding the cubed yellow and white cheese pre-prepared from the local grocery store. There are so many varieties of delicious cheese that can be enjoyed and I have found that most people don't step out of their comfort zone to do so.
 
Some of my favorite cheeses for the cheese tray are:
  • Goat
  • Cheddar (this is a safe one everyone knows)
  • Fontal
  • Gournay
  • Brie
  • Chevre
  • Gruyere
When arranging your cheese, use berries to add color and fill in the void space between the cheeses. Make sure to label the cheeses so people know what they are trying. I also like adding a small dish of chocolate to the tray as a complimentary flavor. Also, don't forget the wafer-like crackers! Enjoy!

Read more...

Ham and spinach quiche


For Christmas morning, my family enjoyed a nice little brunch before heading out to our extended family's crazy family party (I'm talking a wild party!).  I made quiche which is an old standby for the family which my mom used to make all the time when my brothers and sister and I were growing up. Quiche is so simple to make and very filling when you fill the pie with vegitables and meat. I like spinach and ham best.
To make quiche you need (per quiche):

Pie crust (either homemade or store bought)
3 large eggs
1 pint heavy cream
1 cup chopped spinach
1 cup cubed ham
Chopped seasoning vegitables: onions, bell peppers, celery, etc.
1 package finely shredded mozzerella cheese

Pre-heat the oven to 350 degrees. In a mixing bowl, crack the eggs. Before you break the yolk, dip a pastry brush in the egg white and brush the edges of your pie crust. Break the eggs apart and add in chopped spinach, ham, seasoning vegetables, cheese and heavy cream. Add salt and pepper, mix thoroughly and pour into the pie crust. Bake for 40 - 50 minutes (longer if you have more than one pie), until golden brown on top and knife clean.

Remove from oven and let cool for 15 minutes. Enjoy!

Read more...

Orange bundt cake

>> Thursday, December 24, 2009


Perfect for Christmas morning, a beautiful bundt cake will take center stage. I decided to make an orange bundt cake to take over to my parents house to enjoy with my family while we party the morning away.  It was simple to do and is just gorgeous.

All you need to do is follow this simple recipe.

1 cup soft butter

1 cup. sugar
3 eggs
1 cup. sour cream
1 3/4 c. flour
1 tsp. soda
1 tbsp. grated orange peel
1/2 cup sugar
2 tbsp. cocoa
1 tsp. baking powder
2-3 tsp. cinnamon

Directions:
  1. Preheat the oven to 325 degrees. 
  2. In large bowl cream the butter, sugar and add eggs. Beat for 1 minute. The add the sour cream, flour and orange peel to the mixture and stir in slowly until combined.
  3. Grease and flour the bundt pan. Spoon 1/3 of this cake mixture into bundt pan.
  4. Mix 1/2 cup sugar, cocoa and cinnamon. Add 1/2 of this sugar mix to cake batter in pan. Place another 1/3 cake mixture in the bundt pan, then sprinkle on the remaining sugar mix. Add last 1/3 of the cake mix. 
  5. Bake 50 to 60 minutes. Cool for 10 minutes. Invert on to a plate.
 Orange Glaze
1/4 cup. orange juice fresh or concentrate
1/2 cup. sugar
 

Combine 1/4 cup of orange juice and 1/2 cup sugar in a pan and simmer gently. When all the sugar is combined pour over the cake.  Enjoy!
 
Merry Christmas!

Read more...

Chocolate sacks

>> Wednesday, December 23, 2009


With plenty of pies and cookies being baked by my family members for Christmas day, I decided to try something a little different this year. I ended up making an army of chocolate sacks, both dark and white chocolate that are exquisite. A true labor of love as I had never worked with molding chocolate but in the end, I am very pleased with the outcome.  I have been working on forming the sacks over the past couple of days and found the white chocolate much easier to work with than the dark chocolate, where I had several casualties when removing the form.

You can fill a chocolate sack with any number of ingredients but I chose to stick to a simple angel food cake, whipped cream and fresh berries. Once you have your base sack created, they are fun to decorate and can be made into an elegant or a fun and whimsical desert.  For my white chocolate sacks, I added a dark chocolate accent leaf that is brushed with edible gold and silver leaf. These turned out just beautiful.  With the dark chocolate sacks, I went for a more casual feel that will appeal to the kiddos and piped on little holiday pictures. 

To make chocolate sacks, you don't need much.  Just some melting chocolate and a sack form.  I used a small popcorn box that has a wax interior that made it easier to pull off the chocolate once it had hardened. 

With your melted chocolate, pour an ample amount to the inside of your sack form and roll/shake to fully coat the interior. Make sure you have plenty of chocolate in the creases of the sack as this was my biggest problem area.  Once the interior is fully coated, turn it upside down and let the excess chocolate drain out, back into the bowl.  On a parchment paper covered counter, set the sack to dry flipped upside down. 

After you have repeated for all your sacks and they have hardened a bit on the counter top, move them to the refrigerator (not freezer) and let them chill for several hours, or overnight.  To remove the paper sack form, gently peel from the top and tear away a little bit at a time. Be careful not to squeeze your chocolate sack too hard or it will crack and crumble. One other little tip, I turned my air conditioner on to keep the chocolate cool while I was working with it as while the heater was on it was getting a little melty on the counter.

Decorate, fill with your favorite dessert and serve to your very impressed guests.  Enjoy!

Read more...

Blueberry coconut pancakes


I don't have the opportunity to sit down for breakfast at home on weekdays very often as I am usually running out the door at 7 am to head to the office where I will just have a cup of coffee to kick start my days.  Today, in a leisurly manner, I enjoyed my coffee then made myself a delicious stack of blueberry coconut pancakes.  Pancakes are a simple treat and are much better when made from scratch.  You can add in any variety of fruits and spices to make them to your liking but blueberries and coconut are a perfect pair.

Whisk together in a large bowl:

1 1/2 cups all-purpose flour
3 tablespoons sugar
1 1/2 teaspoon baking powder
1/2 teaspoon salt
Cinnamon
Sweet coconut flakes

In another bowl, whisk:
1 1/2 cups milk
3 tablespoons unsalted butter, melted
2 large eggs

Pour the wet ingredients over the dry ingredients and gently whisk them together, mixing just until combined. Fold in fresh blueberries that have been sliced in half.

Season a large skillet or griddle with butter and pour the batter one pancake portion at a time.  Cook on one side until the lightly golden and flip. 

Stack your pretty little cakes on a plate and drizzle with your favorite syrup, warmed if you desire.  I chose a butter pecan syrup which is my absolute favorite.  Sift confectioners sugar over top and enjoy your breakfast!

Read more...

Shells stuffed with peppered goat cheese and potatoes

>> Tuesday, December 22, 2009


I ran into a bit of a problem this evening realizing I hadn't a thing to eat while sitting in a house full of food. Everything is set aside for Christmas and I wouldn't let myself eat only cookies for dinner.  Shopping through my pantry, freezer and refrigerator, I pulled out a mixed bag of ingredients to pull together what turned out to be quite delicious. 

From the pantry, I pulled baby Dutch yellow potatoes and a can of cream of chicken and mushroom. Salt and pepper.

From the freezer, I fetched two Puff Pastry shells.

From the refrigerator, I grabbed a soft goat cheese that had been rolled in pepper, ricotta cheese (I went for the plain yogurt but found it had expired), butter, shallots, garlic and parsley.

Pre-heating the oven to 400 degrees, I started in chopping my potatoes, shallots, garlic and parsley. I popped the pastry shells in the oven for approximately 20 minutes and continued with my dinner experiment.
In a small sauce pan, I combined the cream of chicken and mushroom with ricotta cheese and let it simmer, stirring frequently.  In a small skillet, I melted the butter and added in the potatoes. After cooking down a bit, I added in the rest of the chopped ingredients. 

When the pastry shells were golden, I removed and stuffed with goat cheese and the potato mixture.  I then plated the two shells atop the cream sauce and topped off with a additional creamy goat cheese. 

Not bad for not having anything to eat!

Read more...

Irish Cream Coffee

>> Monday, December 21, 2009


While prepping my kitchen to make, well, a huge mess (chocolate sacks). I opted to fix up one of my favorite Christmas drinks to kick off the festivities. Irish cream coffee takes me back to every Christmas I remember growing up when my parents would always be drinking Bailey's Irish Cream. I have taken to their tradition, adding in a spot of coffee and whipped cream. All you need to make this simple dessert of a drink is:

Baileys Irish Cream
Godiva chocolate liquor
Coffee (I use a light cappuccino roast but use whatever you favor)
Whipping cream
Sugar
Cinnamon
Vanilla extract
Chocolate sprinkles
Hazelnut Pirouettes

To prepare your whipped cream:
  1. Pour a small amount of whipping cream into a mixing bowl
  2. Add in a teaspoon of sugar
  3. Sprinkle with ground cinnamon
  4. Add a couple of drops of vanilla extract
  5. Mix on high speed with a hand mixer, working the cream into stiff peaks
Pour into your Irish coffee mug:
1/3 part Bailey's Irish Cream
1/3 part coffee
1/3 part whipped cream


Drizzle with Godiva chocolate liquor and sprinkle with chocolate sprinkles. Add a hazelnut Pirouette if you are so bold.  Enjoy!

Read more...

Pasta Emilia

>> Sunday, December 20, 2009


After cooking all day making souffle's, soups and chocolate sacks; I wanted something quick, easy. I went for a simple pasta dish incorporating some of my favorite ingredients which are full of robust flavor. I will call it "Pasta Emilia"

In a medium skillet, cook down a serving of angel hair pasta. Once done, drain the pasta and spoon in two tablespoons of light Alfredo sauce. Toss until the sauce lightly coats the pasta. Drizzle with a bit of EVOO then add in a splash of white wine. Cook the pasta in the sauce for a minute or so and add in:

Chopped parsley
Chopped garlic
Chopped scallions
Chopped thyme
Kalamata olives (pitted)
Feta cheese crumbles
Fresh cracked pepper

Toss the pasta and serve, cracking pepper over top. Enjoy!

Read more...

Truffle infused mushroom souffle


Inspired by the French souffle restaurant, Rise, I took to the kitchen to create my own souffle at home. With cookbook in hand and ingredients laid out, step by step I worked my way through creating the most delicious truffle infused mushroom souffle which was a source of great enjoyment on this fine Sunday afternoon.

To make a souffle, you need to first set your workstation. You see, when working with whipped eggs, you must work quickly so it is imperative to have everything at your fingertips and ready to pop in the oven as soon as your mixture is prepared.

So, first we will pre-heat the oven to 375 degrees.

Next, we need to make a Thick Bechamel Sauce (white sauce that will be used as the souffle base). To do this, you will need to combine in a small saucepan:

1 1/4 cups milk
1/4 onion with 1 bay leaf stuck to it using 2 whole cloves
Pinch of freshly grated nutmeg

Simmer over low heat for 15 minutes, uncovered, to infuse the flavor into the milk. Discard the onion, bay leaf and cloves. Meanwhile, melt in a medium saucepan over low heat:

3 tablespoons unsalted butter and stir in 3 tablespoons all-purpose flour

Cook uncovered, stirring occasionally over medium-low heat, 2 to 3 minutes. Remove from the heat. Whisk in the warm milk, slowly, and return the saucepan to heat. Bring to a simmer, stirring to prevent lumps from forming and cook until the sauce reaches the consistency of a thick cream soup. Season with salt and ground white pepper and set aside to incorporate into the souffle base.

Now that the white sauce is complete, prepare your souffle dishes. To do this, generously butter six 8-ounce ramekins and dust the insides with freshly grated Gruyere cheese. Shake out the excess. This will create a golden brown crust of cheese around your souffle after baking.

Combine in a large bowl:
1 1/2 cups Thick Bechamel Sauce (what you made earlier)
3/4 teaspoon salt
1/8 teaspoon ground nutmeg
Pinch of ground white pepper

Beat 1/2 cup of the mixture into:
6 large egg yolks
3/4 cup grated Gruyere cheese

Combine the rest of the sauce, beating vigorously to blend and add:
1 1/2 cups finely chopped cremini mushrooms
1 1/2 teaspoons chopped fresh marjoram
A drizzle of black truffle oil

Beat until stiff but not dry:
6 large egg whites
Pinch of salt

Stir one-quarter of the whites into the souffle base to lighten it, then fold in the rest. Pour into the prepared ramekins. Bake until the souffle is risen and golden brown on top (20 to 25 minutes). Remove from the oven and serve immediately. Enjoy!

Read more...

Onion soup


Onion soup is a great starter dish for lunch or dinner and is quick and easy to whip up. All you need is:

Yellow onion
Chicken broth
White wine
Finely chopped cremini mushrooms
Ground nutmeg
Salt
Fresh cracked pepper
Fresh marjoram
Freshly grated Gruyere cheese

In a large stock pot, begin simmering chicken broth. Chop onions to approximately 2 inch strings and add to the broth. Add in white wine, salt, pepper and ground nutmeg to taste. Chop mushrooms to a fine consistency and add to the soup along with chopped marjoram. Stir and let simmer until onions are softened and ready to serve. Serve topped with grated Gruyere cheese. Enjoy!

Read more...

White chicken chili

>> Monday, December 14, 2009


With the weather turning chilly, there is nothing better than a little chili to warm your belly. I am not really a fan of traditional chili but white chili is quite delightful. A much healthier rendition of the dish, white chili is quite easy and is sure to tide you over for a couple of days.

To start, you need the following ingredients:


Navy beans
Black beans
Chicken
Carrots
Celery
Onion
Scallions
Red and green bell peppers
Serrano peppers
Garlic
Chicken stock
White wine
Fresh thyme

Fresh flat parsley
Powdered mustard
Chili powder


First, you will need to prepare your beans. You can either do this by soaking overnight or by bringing to a rapid boil for 5 or so minutes then soaking for an hour. These are dry beans, mind you. Not canned or frozen.

In the meantime, prepare your stock. This is just a typical stock mixture of carrots, onion and celery. Soften over heat in a large stock pot with about two tablespoons of olive oil. After the base stock has started to cook down, you can start to add in the other veggies and fresh herbs, all chopped. Add in chicken stock and let the veggies simmer. Cut your chicken into large pieces and add into the mixture, along with white wine. Salt and pepper to taste. Add in powdered mustard and chili powder, and continue to cook together.

After an hour or so, drain the beans, rinse and add to the large stock pot with the chili. Simmer for one hour.

In a small pot, prepare white rice per the package instructions.

Serve dinner up rice first, with chili over top in a bowl. Drizzle with sour cream and top with parsley. Enjoy!

Read more...

Chocolate mice & strawberries

>> Thursday, December 10, 2009


So here's a fun idea for all of you who have kiddo's at home. I used to make these when I was little so decided to take a trip back in time today as I spend the day cooking to re-create an old holiday favorite of mine. Chocolate mice are simple to make, taking a whimsical approach to a holiday dessert. All you need (aside from a steady hand) is:

Melting chocolate
Cherries
Hershey's Kisses
Slivered almonds
Decorating gel
Parchment paper

To make the body of the mouse simply dip your cherries in a bowl of melted chocolate and lay on parchment paper. If your cherries have stems, lay them flat so they appear to be the tail of the mouse. Take an unwrapped kiss and gently attach the flat part of the kiss to the chocolate covered cherry. Find two similarly sized almond slivers and carefully insert side-by-side between the kiss and the cherry.

Repeat this until all your cherries are transformed into little mice and let them thoroughly dry.

Dot decorating gel on the nose and to make eyes and refrigerate until ready to serve. Enjoy!

Another fun idea for chocolate is chocolate covered strawberries. These are so simple to do but so delicious! Again, you need a nice melting chocolate, parchment paper and, of course, strawberries.


Melt your chocolate on half power in the microwave for about 2 minutes and stir until melted. Dip your strawberries and lay on their sides on the parchment paper. That's it! Once dry, refrigerate until ready to serve. Upon serving, you can sift a bit of confectioners sugar over top for an extra wow effect.

Read more...

Linzer Sandwich Cookies


With the holiday season upon us, its time to get to baking. Whether you are hosting a party, baking sweets to put under the tree or just enjoying a treat while warming by the fire, making cookies is a great way to spark your holiday spirit. This week, I kicked off my baking with Linzer Sandwiches. These delicate cookies are beautiful and delicious. You can get creative with the shape of cookie you select, from round cookies to holiday shapes. What makes the Linzer Sandwich so unique is the center shape punched out of the top cookie to reveal a sweet jam inside.

I decided to make snowflake shaped Linzer Sandwiches. When covered with confectioners sugar, the shape really worked well; though the more intricate the shape, the more delicate the cookie so be careful what cutter you select based on your baking skill level.

To get started on this holiday treat, you will need the following ingredients to make around 20 cookies:

5 ounces unblanched hazelnuts
1/2 pound (2 sticks) unsalted butter, room temperature
1/2 cup granulated sugar
1 large egg
1 teaspoon pure vanilla extract
2 cups plus 2 tablespoons all-purpose flour, plus more for work surface
1 teaspoon baking powder
1 teaspoon ground cinnamon
1/4 teaspoon ground nutmeg
1/4 teaspoon table salt
Confectioners sugar, for dusting
2/3 cup raspberry, strawberry or cherry jam


Preheat the oven to 375 degrees. Place hazelnuts on a baking sheet, and toast in the oven for 10 minutes. Remove from the oven and immediately transfer nuts to a clean towel. Vigorously rub the nuts in the towel to remove as much of the skins as possible. Set nuts aside until completely cool. Place nuts in a food processor, and process until finely ground and set aside.

In a large bowl, beat butter and sugar on medium speed until light and fluffy, about 2 minutes. This works best if you have a mixer fitted with a paddle attachment. Add egg, and beat until smooth, about 3 minutes. Beat in vanilla.

Whisk together reserved hazelnuts, flour, baking powder, cinnamon, nutmeg, and salt. Add to butter mixture; beat on low until combined, about 2 minutes. Form dough into two flattened disks, wrap with plastic wrap, and refrigerate until firm, at least 1 hour or overnight.


Preheat oven to 350 degrees. Have ready two baking sheets lined with Silpats or parchment paper. Also have your cookie cutters ready. One for the cookie shape that is about 2 1/2 inches and one for the center that is about 3/4 inches. On a lightly floured work surface, roll out half the dough to a scant 1/4 inch thickness. Using the larger cutter, cut out cookies. With a wide, flat spatula, transfer cookies to the prepared baking sheets. Using the smaller cutter, cut the centers out of half the cookies. Repeat rolling and cutting with the other half of the dough.


Bake until the edges are golden, 12 to 16 minutes, rotating halfway through. Remove from the oven; place on a wire rack and cool completely.


Lightly sift confectioners' sugar other the decorative tops (the ones with the center cut out); set aside. Spread a scant tablespoon of jam on the bottoms of each cookie, and sandwich with the sugar dusted tops.


Enjoy your holiday cookies!

Read more...

Osso buco

>> Monday, December 7, 2009


Tonight I challenged myself to prepare osso buco for the first time. Diligently following the recipe in The Joy of Cooking, I prepped my workstation and cut my vegetables. Literally translated, osso buco is a bone with a hole that contains marrow. In this classic north Italian dish, a seasoning mixture, gremolata, is added at the end. So, read carefully and allow yourself at least 3 hours to prepare this amazing dish.

Position a rack in the lower third of the oven and pre-heat to 325 degrees.

Pat dry your very meaty slices of veal shank.

In a large Dutch oven with a tight-fitting lid, hat over medium-high heat:

2 tablespoons olive oil

Add the shanks and brown well on all sides, adding more oil as needed. Remove to a plate. Reduce the heat to medium-low and add to the pan:

1/3 cup diced carrots
1/3 cup diced onions
1/3 cup diced celery
3 cloves garlic, crushed
1 small bouquet garni (this is a tied up bouquet of spices)

Cook, stirring, until the vegetables are softened, 5 to 10 minutes. Return the shanks to the pan and arrange in a single layer.

1 cup dry white wine
1 cup chicken stock

The liquid should reach about halfway up the shanks. Increase the heat to high, bring to a boil, and cover with the lid. Place in the oven and braise for 1 hour.

Have available 1 to 2 cups chicken stock.

Turn the shank slices over and add stock if needed to keep the level halfway up the shanks. Braise until the meat is tender (absolutely falling off the bone), about 30 minutes more.

Meanwhile, to prepare the gremolata, mix together in a small bowl:

2 tablespoons chopped fresh flat-leaf parsley
2 cloves garlic, minced
2 teaspoons grated lemon zest

When the veal is cooked, remove the shanks to an ovenproof serving platter and keep warm in the oven with the door ajar. Spoon off any fat from the braising juices; strain the juices into a saucepan, and boil over high heat until slightly thickened. Add the gremolata and season with salt and fresh pepper to taste.

Spoon the sauce over the veal. Serve with risotto milanese or rice pilaf. Enjoy!!

Read more...

Seared tuna sashimi

>> Sunday, December 6, 2009


Tonight I pulled together a quick tuna sashimi for dinner. Seared to perfection, then sliced thinly for optimum enjoyment. Tuna sashimi only takes about 5 minutes to cook but you have to make sure you buy a sushi grade cut of fish. I recommend going to Whole Foods or Central Market, not your regular grocery story.

All you need is Yellow Tail Tuna steak, fresh cracked pepper and sesame oil.

In a large skillet or Wok, lightly season the pan with sesame oil. Heat the pan over medium-high heat.

In the meantime, crack an ample amount of pepper over the surface of the tuna steak. Place the tuna in the heated skillet and sear for one minute. Flip and sear the other side for one minute.

Fill a bowl with ice water and set aside. Pull your tuna from the heat and drop into the ice water. This exercise is key as it pulls the heat through your fish. Remove from the water and thinly slice, plate and serve. Enjoy!

Read more...

Rolled chicken over spinich linguine with alfredo

>> Saturday, November 28, 2009


Tonight I made a delicious little dish of chicken rolled around spinach and ricotta cheese served over spinach linguine with alfredo. The dish is pretty simple to make with an extraordinary return on the effort.

You will need:

Raw chicken breast tenders (3 per serving)
Ricotta cheese
Chopped spinach
Spinach linguine
Alfredo sauce
Butternut squash
EVOO
Butter pecan syrup
Salt
Fresh cracked pepper
Butter

For starters, pre-heat your oven to 400 degrees.

To prepare the chicken, you will need a meat hammer. Lay a sheet of plastic wrap over your workstation and situate your chicken breast tenders a few inches apart from each other. Cover with another layer of plastic wrap and gently hammer the meat flat, starting in the center and working your way around the edges.

Once your chicken is flattened into a thin layer, spread a spoonful of ricotta cheese over the top of each piece then top with chopped spinach. Pull the two short ends together, enclosing the cheese and spinach inside the chicken. Overlap the edges and stitch closed with a toothpick. Repeat for all pieces of chicken. Place the chicken rolls in a baking dish with a spot of EVOO and gently brush the tops with EVOO as well. Put in the oven to bake for 20 minutes.

In the meantime, cook the linguine according to box directions, boiling for approximately 7 minutes.

Next, wash your squash and slice into quarter inch rounds then halve. Cut out the center seeds and remove the skin from each half moon then dice. In a small skillet, saute squash in butter. Add in salt and pepper to taste. After the squash has softened, add a few drops of butter pecan syrup to the skillet, toss and continue cooking.

Tending to your chicken again, brush the tops of each chicken roll with the butter pecan syrup. This makes your chicken brown up nicely with a sweet, yet nutty flavor.

Once your pasta is done cooking, drain and return to its large skillet. Add in two tablespoons of alfredo sauce and toss, simmering over low heat. Add the butternut squash and continue to cook together.

Plate the pasta and top with chicken rolls. Enjoy!

Read more...
Homemade pizza

>> Friday, November 27, 2009


For a quick and simple meal after Thanksgiving without leftovers, I went for pizza. No, I didn't order from my favorite pizza place, Marcos, but rather made my own.

For the crust I went for a flaky alternative to the traditional pizza crust. Thaw one sheet of puff pastry and open to lay flat. Top with Ricotta cheese, spreading thinly all over the crust. Next, lay Italian Prosciutto and top with shredded Romano cheese. Add black olives, pine nuts, onions and add another layer of Romano cheese. Spoon marinara sauce over the pie and top with Parmesan cheese. Season with Oregano and pop in the oven for 25 minutes at 350 degrees. Remove from the oven and top with fresh avocado. Enjoy!

Read more...

Creamy farfalle pasta with beef brisket

>> Monday, November 23, 2009


In preparation for a week full of way too much delicious food, I decided to clear my fridge of my remaining beef brisket from the weekend and create a simple pasta dish for dinner. Pasta is a great way to utilize meat leftovers after Thanksgiving day so I thought this appropriate for tonight's little blog.

The ingredients:

Farfalle pasta
Beef brisket (or chicken, turkey, ham, etc.)
3 tablespoons plain yogurt
3 tablespoons sour cream
2 tablespoons cranberry chutney
Chives
Fresh cracked pepper
One lime
Romano cheese

Cook the pasta according to the box directions. In a small bowl, mix yogurt, sour cream and cranberry chutney together. Crack fresh pepper in the cream sauce and pour into cooked, drained pasta. Add in cut pieces of brisket and cut chives then cook over low heat, stirring frequently. Slice the lime and squeeze one half of the lime over the the pasta. Continue stirring until heated through and serve with Romano cheese. Enjoy and remember you can make a great dish with all those yummy leftovers after Turkey Day!

Read more...

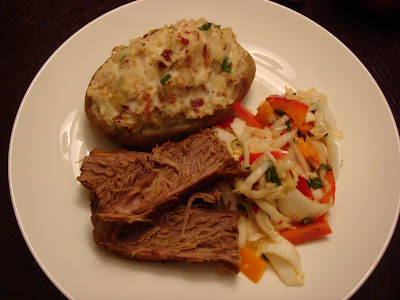
Beef brisket with Asian cabbage slaw and twice baked potato

>> Saturday, November 21, 2009


Tonight, I catered to the request of my 87 year old next door neighbor for a home cooked meal. You see, his wife is in the hospital after breaking her hip so I am keeping an eye on him while she is away in recovery. When I asked what his favorite meal is, he said "beef brisket with cabbage and a baked potato with all the fixin's." Not my typical meal, I went to Food Network to see how I could take a meal that seemed a little bland and "Emilyize" it.


For the beef brisket, I whipped up a rub with flavor as big as Texas that included:

2 tablespoons chili powder
2 tablespoons salt
1 tablespoon garlic powder
1 tablespoon onion powder
1 tablespoon ground black pepper
1 tablespoon sugar
2 teaspoons dry mustard
1 bay leaf, crushed
4 pounds beef brisket, trimmed
1 1/2 cups beef stock

Mix the first 8 ingredients together and rub on all sides of your brisket (which has been brought to room temperature). In a roasting pan, put your seasoned meat into the pre-heated oven at 350 degrees for 1 hour, uncovered. After an hour, add beef stock and enough water to bring the liquid level up to about 1 1/2 inches. Cover tightly and resume cooking for 2 more hours, lowering the temperature to 300 degrees.

(An hour or so later)

It's time to start on the cabbage. Now, this is not just your everyday boiled or sauteed cabbage. It is a cold cabbage slaw that has an Asian influence and is really amazing. To make it, you need:

1 lime, juiced
3 tablespoons rice vinegar
2 tablespoons Asian chili oil
1 tablespoon mayonnaise
1 tablespoon soy sauce
3 cups finely shredded napa cabbage
1 red bell pepper, thinly sliced
1 orange bell pepper, thinly sliced
1/2 cup water chestnuts
3 scallions, thinly sliced
Salt and freshly ground black pepper

Whisk together the lime juice, vinegar, chili oil, mayonnaise and soy sauce in a large bowl. Add the cabbage, peppers, water chestnuts and scallions and toss to combine. Season with salt and pepper, to taste. Refrigerate for at least 30 minutes to allow flavors to meld.

(A little later still)

T
he meat is nearly done so it is time to make the potatoes. Thoroughly wash the potatoes, wrap in a wet paper towel and pop in the microwave for 12-15 minutes to cook initially. In the meantime, mix together in a small bowl a few spoonfulls of:


Greek plain yogurt
Sour cream

Add in some chopped chives and bacon and mix. Season with oregano, salt and pepper to taste.

Once the potatoes are done cooking, cut the tops off lengthwise and peel the skin off the top portion. Mash the removed, de-skinned tops in a bowl and add in the creamy mixture you just created. Mix thoroughly and spoon back into the bottom potato "bowls". Pop the potatoes into the oven for 10 minutes at 350 degrees. At this point, go ahead and remove the beef brisket from the oven and let the meat rest prior to cutting it.

After resting, cut the meat thinly. Plate the food and enjoy!

Read more...

Cinnamon Coffee Cake


After traveling all week, I am finally back in the kitchen cooking. This morning, I woke up and enjoyed a nice cup of coffee and decided to prepare individual coffee cakes for the weekend. There is a bit of a chill in the air and the warm cake sounded like the perfect compliment for the morning. Cinnamon was the choice recipe for this fine day so I pulled up a recipe online to get started. I headed to the kitchen with my laptop and went to work pulling the ingredients as follows:


1 cup plus 1 additional tablespoon of all-purpose flour

1/2 cup chopped pecans

1/2 cup milk
1 large egg
1/2 cup sugar

1/3 cup brown sugar - packed

1/4 cup shortning

1 tablespoon cold butter - cut into small pieces

1 teaspoon baking powder

1/2 teaspoon ground cinnamon

1/4 teaspoon salt

1/8 teaspoon nutmeg


With a countertop full of ingredients, preheat oven to 350 degrees.


Grease individual soufle dishes (4) or one 9-inch baking dish and flour lightly.


In a small bowl, combine the brown sugar and 1 tablespoon of flour. Cut in the butter with your fingers until mixture is the consistency of coarse wet sand. Stir in the pecans, and set aside.


In a large bowl, sift together the flour, baking powder, salt, cinnamon, nutmeg and sugar. Add the shortening and milk. Mix until well combined (a minute or 2 with an electric blender). Add the eggs and beat until well blended and you get a batter consistancy.


Pour half of the batter into the prepared dishes. Sprinkle two-thirds of the pecan mixture over the batter in the pan. Pour the remaining batter into the pan, and sprinkle the remaining pecan mixture over the top.


Bake for 35 to 40 minutes - until a knife inserted into the coffee cake comes out clean.


Enjoy your coffee cake and the rest of your day!

Read more...

Breaded pork with artichokes and pear basil butter sauce

>> Tuesday, November 10, 2009


Tonight, my Puerto Rican Cookery cookbook turned me on to a breaded pork chop which was quite delectable. Easy to make, though the wait was about an hour in the oven. To make the pork chop all you need is:

Boneless pork chops
Salt
Pepper
Chopped garlic
Oregano
2 eggs
Bread crumbs

Lightly season the pork chop with salt, pepper, garlic and oregano then dip in a mixture of eggs and salt (gently beat). Roll in bread crumb then place in a square, lightly buttered baking dish. Put in the oven, previously preheated to 350 degrees, for one hour.

About 30 minutes into the pork cook time, cut your artichoke in half lengthwise. Bring a large pot of water to boil and submerge the artichoke halves. Meanwhile, cut a pear into chunks, removing the core, and put into a food processor with three basil leaves, chopping into a fine puree. In a small skillet, heat the puree with three tablespoons of butter, stirring frequently.

When the artichoke is cooked through so the leaves pull apart easily, remove from the water. Pull the leaves off the core, one by one, and serve in a small dish separately to dip in the pear basil butter.

Serve aside the breaded pork chop and enjoy!

Read more...

Winter peach pie

>> Sunday, November 8, 2009


Tonight I made my first pie from scratch and managed to surprise myself with the outcome. A winter peach pie with a lattice top was my goal, and my goal was accomplished. To make a pie, you first must tackle the crust. To make a pie crust, mix in a large bowl:

2 1/2 cups all-purpose flour
1 teaspoon white sugar
1 teaspoon salt

Add:
1/2 solid vegetable shortening and 8 tablespoons (1 stick) cold unsalted butter

Break the shortening into large chunks and cut the butter into small pieces then add to the flour mixture. Cut the fat into the dry ingredients by chopping with a pastry blender until the consistency is dry and powdery, not pasty. Drizzle over the top 1/3 cup plus 1 tablespoon ice water.

Using a rubber spatula, cut with the blade side until the mixture looks evenly moistened and begins to form small balls. Press down on the dough with the flat side of the spatula. If the balls of dough stick together, you have added enough water. If not, add 1 to 2 tablespoons of ice water and repeat. Cut your dough into two pieces and press into two flat disks and wrap tightly in plastic. Refrigerate for at least 30 minutes.

In the meantime, to make the filling you will need:

2 1/2 pounds canned sliced peaches, "packed in juice"

Pour into a sieve set over a bowl and shake lightly to drain. Measure 3 cups of fruit and 1/2 cup of juice and combine in a large bowl with:

2/3 cup dark raisins
2/3 cup firmly packed light brown sugar
3 tablespoons cornstarch
2 tablespoons strained fresh lemon juice (1 lemon)
1/2 tablespoons ground ginger
1/4 teaspoon ground cinnamon
1/4 teaspoon ground nutmeg
1/8 teaspoon ground cloves

Let stand for 15 minutes while pre-heating the oven to 425 degrees.

Roll your dough into a large circle on a floured surface with a floured dough pin. The key to rolling your dough is to apply pressure on an angle and roll in opposite directions, not back and fourth. Carefully lift your dough and lay inside the pie pan, trimming the edges to 1/4 inch and folding under the edges. Roll the second disk of dough and either cut into long strips to create a lattice top or leave in tact to create a closed top crust.

Fill your pie with the filling and top with the crust. Brush the top with an egg yolk mixture (1 egg yolk + 1/8 teaspoon water).

Bake the pie for 30 minutes. Slip a baking sheet beneath it, reduce the heat to 350 degrees and bake until thick juices bubble through the vents, 25 - 35 minutes. Let cool completely on a rack before serving.

Enjoy!

Read more...

Cranberry chutney stuffed chicken

>> Friday, November 6, 2009


So, first I want to start with an apology for not cooking all week. I missed my kitchen and the smell of delicious dinner aromas filling the house but had an extremely busy week between a surprise birthday party for my grandmother (where I made appetizer sized balls which were a huge hit -- refer back to "Balls" recipe on a previous post) and hosting a charity golf tournament.

So, after a long week I decided to stay in for the evening and make a cranberry chutney, basil and feta stuffed chicken. This is a fairly simple dish to whip up so lets get started.

The ingredients you will need are:

One full boneless skinless chicken breast
Fresh basil
Feta cheese
Cranberry chutney
Fresh cracked pepper
Olive oil
Butter pecan syrup

Spread your chicken breast cut side up. Pick, snap the stems and thoroughly wash several leaves of basil and lay on the chicken. Sprinkle with feta cheese and spoon several spoonfuls of cranberry chutney in the center. With twine, bind the center and one end portion of the chicken pulling the sides together around the chutney.

Place the chicken in a baking dish with a small amount of olive oil. Pop in the oven at 375 degrees and let bake. After about 20 minutes, brush the chicken with the syrup and the juices from the chutney.

Once the chicken is cooked through, remove from the oven and plate. Serve with the side of your choice and enjoy!

Read more...

Greek burger

>> Thursday, October 29, 2009

Tonight an inspired burger came to life by combining my favorite ingredients into such a simple dish and born was a masterpiece for my mouth's enjoyment. I call this a Greek Burger by association of ingredients. This didn't come from any certain recipe but when I ate it, I thought... Greek. So there you have it.


Start with lean ground beef. 96% lean to be exact. Pressing into a patty, gently salt and crack a light coat of pepper. Next, sprinkle with garlic and red pepper flakes (careful here, not too much). For the next part of the recipe you will need:

Sun dried tomato and olive paste
Red onions, sliced and separated into strings
Butter, 2 tablespoons
Hamburger bun
Avocado
Feta cheese

Rub a tablespoon of the tomato olive paste on the hamburger patty. Mix the meat together and reshape into a patty. In a large skillet, melt 2 tablespoons of butter. Dip the inside of each side of your bun in the butter and set aside. Pre-heat the oven to 350 degrees.

In the same skillet, drop the patty to cook, making sure to flip often until the natural juices from the meat coat the pan. Once the patty has browned on both sides, add onion strings to the skillet to cook along side the patty.

Pop the hamburger bun into the oven, face down on the middle rack to warm. Let cook for 5 - 7 minutes and plate. Once the hamburger patty is cooked to your desired temperature, place on the bottom bun. Top with onion strings, feta cheese and a ball of avocado.

Serve with veggies, salad or corn on the cob. Enjoy!

Read more...

Eggs over rice with lentils -- sunny side up!

>> Monday, October 26, 2009

I have stumbled on a breakfast combination that is both unexpected, and the most perfect recipe for morning enjoyment which was created from leftover lentil rice and a carton of eggs. The boxed (yes, boxed) variety of rice with lentils is delicious for both dinner and at breakfast time. On a plate, reheat a few spoonfuls of the rice.


In a large skillet, melt a dab of butter, crack and egg and let it cook unbroken until the white starts to firm. Carefully, slide a spatula under the egg and quickly flip over. Let the egg cook for another 10 seconds or so and flip back to the original side. Serve over the rice and enjoy!

Read more...

Slow roasted chicken

For dinner tonight I decided to use my dutch oven which has been safely stored on the top shelf of my cupboard for about the last 7 years, when I received it as a gift from my grandmothers cousin. What to cook in the dutch oven, I asked myself? A chicken. Perfect! So, I bought a whole chicken to test out the slow cooking method. With the cute little bird on my counter, I patted with salt and pepper, then laid it to rest in the pretty little dish. Surrounding the bird with chopped carrots, leeks, scallions, red cabbage, parsley and mushrooms, and adding in a sufficient amount of chicken stock and a few basil leaves, I topped off the dutch oven and put in to cook.


About two hours later, I pulled the dutch oven and opened the lid to find a delicious treat. The most tender chicken and veggies I have ever had. I love my dutch oven and and sorry I have ignored it for so long!

Read more...

Mahi Mahi with mango butter sauce

>> Wednesday, October 21, 2009

Tonight I prepared a new dish that brings together a few of my very favorite ingredients. Playing off my idea for a restaurant someday called FishBerries (if you are reading this, you must promise not to take my restaurant name!), I paired a mahi mahi with mango, kiwi and pear butter sauce. The ingredient list for the dish is:


Mahi mahi (skin removed)
Mango (skin removed and finely chopped)
Kiwi (skin removed and finely chopped)
Pear (cored and chopped)
Mustard powder
Unsalted butter
Garlic
Red wine vinegar
Light rum

To make the mango butter sauce, combine 3/4 of each fruit variety in a food processor or blender with 1 teaspoon of mustard powder, chopped garlic and red wine vinegar. Add in 2 tablespoons of butter and blend until smooth and creamy.

In a large skillet over medium heat, toss the mahi mahi with mango butter sauce, coating all sides. Cook in sauce, turning periodically. Just before the fish is flake done, add the remaining 1/4 chopped fruit to the pan to heat. Toss in a splash of light rum if you are as bold as I!

Serve the fish with vegetables and rice. When plating your fish, sprinkle the fruit topping over top and add a dab of the heated mango butter sauce. Enjoy!

Read more...

Pan fried halibut with green beans

>> Tuesday, October 20, 2009

For dinner this evening, I whipped up a quick pan fried halibut with fresh snapped green beans. After arriving home late after a going away party for a friend, I needed something quick and easy, but of course, tasty.


The ingredients which came together for dinner included:

Halibut
Fresh snapped green beans
One egg
Bread crumbs
Flour
Lemon juice
Cherry tomatoes
Capers
Scallions

To start, beat the egg in a medium bowl with a fork. Add in equal parts flour and bread crumbs and stir until the dry ingredients are coated with egg. Tending to the halibut, remove the skin from the bottom and coat in the breading mixture. Place in a hot skillet with melted butter and cover, turning periodically.

Separately, prepare the green beans snapping or cutting the ends from each bean. Toss into a skillet with a variety of cherry tomatoes, lemon juice and add a pinch of salt and crack pepper over the top.

Wash and cut your scallions and add to the halibut skillet with a spoon full of capers. Let cook for another couple of minutes until the scallions and capers are heated through.

Plate and serve immediately. Enjoy!

Read more...

Beef tenderloin with sweet potatoes and wilted spinach

>> Monday, October 19, 2009

Tonight my delight of the evening was centered around a fine cut of beef, paired with the sweetest sweet potatoes and wilted spinach. The difference in flavors--sweet and citrus, pepper and garlic--made a great combination.


To start, you need the finest cut of meat you can get from your local grocer. I went for an 8 ounce fillet of beef tenderloin. To cook, rub the steak, uncut, with extra virgin olive oil then salt and pepper all over, patting the seasonings into the steak. In a hot skillet, quickly sear all sides of the steak to lock in the juices, then transfer to the oven where you will cover with foil and bake at 350 degrees.

Once the steak is in the oven, thoroughly wash your sweet potatoes and place into a pan of salted water which just covers the top of the potato. Boil until toothpick soft in the center, approximately 30 minutes. As the potatoes are nearly done, turn off the oven and let your steak sit, undisturbed until ready to serve.

Transfer your potatoes to a large bowl and remove the skins (they should come right off) and discard skins. Mash the potatoes with a fork, add in a pat of butter and blend on a low speed with a hand blender. Add in orange juice and continue blending until consistency is as you like it.

In a small skillet, melt a pat of butter and add washed spinach leaves, chopped fresh garlic, salt and pepper. Cook quickly until just wilted.

Remove the steak from the oven. Plate your food and top potatoes and spinach with crumbled feta cheese. Enjoy!

Read more...

Search!

  © Blogger template Simple n' Sweet by Ourblogtemplates.com 2009

Back to TOP